Quick answer: socially distanced event ticketing works best when you design the physical layout first, then turn that layout into ticket types, capacity limits, timed entry windows, email instructions, and a check-in plan. The ticket setup should mirror how people will actually move through the venue.
Even if the original reason for socially distanced events was the pandemic, the planning model is still useful today. It applies to limited-capacity venues, family zones, premium pods, seated outdoor shows, safer crowd management, quiet areas, accessibility-friendly layouts, and any event where comfort matters as much as attendance numbers.
The mistake many organizers make is starting inside the ticketing software. They create a few ticket types, reduce the total capacity, and hope the event day will make sense. A better approach is to start with the attendee journey: arrival, entry, waiting, seating or standing, movement around the venue, exits, and support points. Once that journey is clear, Tickera can help you sell the right ticket types and keep the gate flow organized.
Quick Takeaways
- Plan usable capacity, not theoretical venue capacity.
- Turn physical zones, pods, tables, or sections into clear ticket types.
- Use timed entry when one arrival wave would create queues.
- Explain group size, arrival rules, and access points before checkout.
- Make ticket emails repeat the most important event-day instructions.
- Train check-in staff around ticket type names, entrances, and exceptions.
Why Capacity Planning Comes Before Ticket Setup
A venue may legally hold 500 people, but that number does not tell you how many people can comfortably attend under a spaced layout. You need to subtract walking lanes, staff areas, emergency access, entry queues, restrooms, vendor areas, and empty space between groups. The number that matters is usable event capacity.
For outdoor events, this often means drawing the layout before tickets go on sale. For indoor events, it may mean blocking off rows, limiting sections, or creating wider routes to reduce crowding. In Tickera, your final ticket quantities should reflect that realistic layout. This prevents overselling and makes the event easier to explain to buyers.
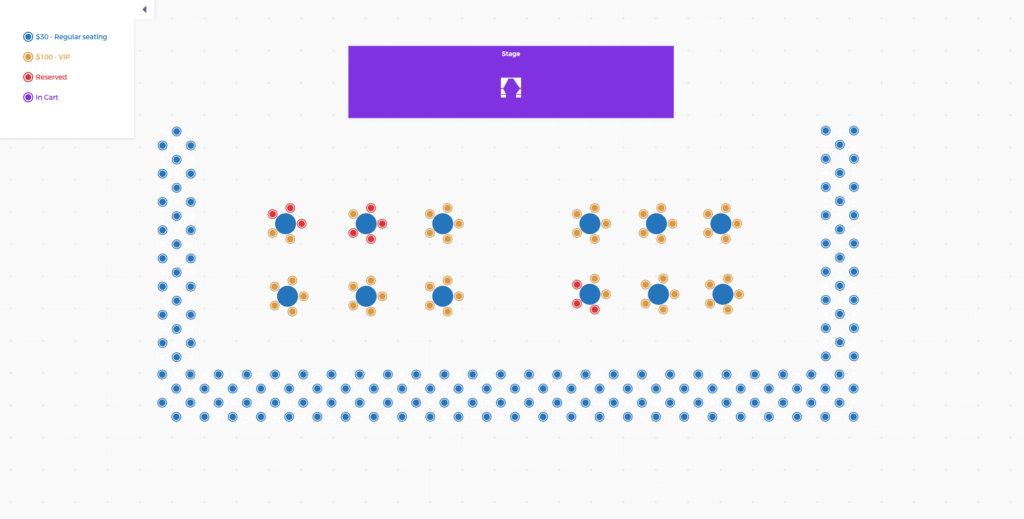
Turn the Venue Layout Into Ticket Types
Once the layout is defined, translate it into ticket types that buyers understand. Instead of one vague “General Admission” ticket, you may need “Front Lawn Pod”, “Table for 4”, “Balcony Section”, “Family Zone”, “Accessible Viewing Area”, or “6:30 PM Entry Window”. Clear names reduce support questions and help staff route attendees on event day.
| Layout decision | Ticket setup | Buyer expectation |
|---|---|---|
| Pods or marked spaces | Sell each pod as a ticket type or limited product | Buyers know their group has a defined area. |
| Reduced seating rows | Sell by section or seating category | Attendees know where they should go. |
| Multiple arrival waves | Create timed entry ticket types | Queues are spread across the opening period. |
| Premium spaced area | Create VIP or reserved-zone tickets | Higher-value access is easy to understand. |
Use Timed Entry to Protect the Gate Flow
Social distancing usually fails at the entrance first. Even if the venue layout is perfect, a single arrival wave can create a crowded line before anyone reaches their assigned area. Timed entry helps by spreading arrivals into smaller groups.
You can create different arrival windows as separate ticket types, or you can assign arrival guidance based on section. The important thing is that the arrival window appears in the ticket description, confirmation email, reminder email, and on-site signage. If the buyer only sees it once, many people will miss it.
Write Event Page Copy That Prevents Confusion
A socially distanced event page should be more direct than a normal event page. People need to know exactly what they are buying. Is the ticket for one person or a whole group? Can a group leave and return? Are children counted inside the pod limit? Is late arrival allowed? Can friends buy adjacent spaces?
Place these details near the ticket section, not only in a long policy page. The closer the explanation is to the purchase decision, the fewer refund requests and support emails you will receive later. If you are improving the event landing page itself, this guide may also help: how to build an event landing page that sells tickets.
Make Ticket Emails Operational, Not Just Transactional
The ticket email should do more than confirm the purchase. It should prepare the attendee for arrival. Include the ticket type, arrival time, entrance name, zone name, group-size rule, support contact, and any important venue restrictions. If the event has a map, link to it from the email.
Use the same wording everywhere. If the ticket says “Blue Zone”, signs at the venue should say “Blue Zone”. If the email says “Gate 2”, do not label the entrance “North Lawn” without also showing “Gate 2”. Consistency reduces hesitation, and hesitation is what creates lines.
Prepare Check-In Around Exceptions
Most attendees will follow the rules if the instructions are clear. The difficult part is handling exceptions: late arrivals, wrong entrance, oversized groups, duplicate tickets, screenshots, and people who bought the wrong ticket type. Your check-in team should know what to do before doors open.
If you are using Checkinera, test scanning with the same devices and network conditions you expect at the venue. For busy entrances, prepare more than one scanning device and make sure staff know how to read ticket type names quickly. For more entry workflow ideas, see how to maximize Checkinera efficiency at event check-in.
Socially Distanced Ticketing Checklist
- Map the venue into zones, pods, sections, tables, or timed entry groups.
- Set ticket quantities from usable capacity, not maximum venue capacity.
- Name ticket types in the same language attendees will see on-site.
- Explain whether tickets are per person, per group, per table, or per vehicle.
- Add arrival windows where one queue would create crowding.
- Repeat the most important rules in ticket emails and reminder emails.
- Prepare signage that matches ticket type names exactly.
- Test the full check-in process before attendees arrive.
Frequently Asked Questions
Can Tickera handle socially distanced event ticketing?
Yes. Tickera can manage ticket types, quantities, ticket emails, event pages, and check-in. The key is to structure ticket types around the actual venue layout and attendee flow.
Should I sell individual tickets or group pods?
Use individual tickets when each attendee needs separate access. Use group pods, tables, or zones when people should arrive and stay together as a group. The ticket name should make that difference obvious.
How do I avoid crowding at check-in?
Use timed entry, multiple entrances where possible, clear signage, trained staff, and tested scanning devices. Most check-in problems come from unclear instructions, not from the scanner itself.
Do socially distanced event rules still matter?
Yes, even outside a pandemic context. The same principles help with premium experiences, family areas, reduced-capacity venues, safer crowd movement, and better attendee comfort.
Good socially distanced ticketing is not just about selling fewer tickets. It is about turning a clear physical plan into a clear buying experience. When the layout, ticket types, emails, signage, and check-in process all match, attendees arrive with fewer doubts and your team can run the event with fewer surprises.