Quick answer
This walkthrough shows how to set up a multi-day music festival in Tickera: separate tickets for each day, two-day combinations, a full four-day pass, and a limited VIP tier with reserved seats and complimentary drinks. It uses the Tickera core plugin, Seating Charts, and a barcode reader for check-in.
- Create per-day, multi-day, and full-festival ticket types.
- Use Seating Charts for a limited, reserved VIP area.
- Plan barcode check-in for fast entry across multiple days.
A festival lives or dies on smooth entry and the right pricing. Pair this setup with our guides on ticket check-in at the door and event ticket pricing strategy.
Scenario
You are hosting a music festival that runs for four days. You want to sell the tickets for each of the days separately, one ticket that is valid for the first two days, one ticket valid for the last two days and, of course, a ticket valid for the whole four days. Apart from this. there is also a VIP area with limited number of expensive tickets that include reserved seat and complimentary drinks.Requirements
As this scenario is quite simple, we’ll not be using plenty of stuff but only a few essentials:- Tickera (core plugin)
- Seating Charts
- Barcode Reader
Getting hands dirty
Assuming that you have installed and configured all the aforementioned plugins, we can start creating events and tickets. If you’re not sure how to set up Tickera, you can find explanation of each and every bit of it in our documentation pages here. Same goes for the Seating Charts add-on for which you can find documentation pages here. Barcode Reader add-on does not require any special setup and we’ll be using it only to get the barcode ticket type element so that we can use any standard barcode scanner at the entrance to check the tickets in using Check-in Chrome Desktop app.The “regular” part of the event
We’ll start off by creating an event that we’ll be using for the “regular” ticketing but at the same time we’ll use the same event page as the cornerstone and starting point for selling all the tickets available for this event. So, just create an event as you would normally do (thorough instruction on that can be found here), set its title to what you like, set the event start and end date and time and check Show Tickets Automatically checkbox as displayed on the screenshot below; Other fields are completely optional but, of course, if you want, you can fill those as well.
Once you’re done, click Publish and that’s it for now regarding creating the event. We’ll get back to it later to add some more stuff to the content but we’ll leave it for now like this.
Other fields are completely optional but, of course, if you want, you can fill those as well.
Once you’re done, click Publish and that’s it for now regarding creating the event. We’ll get back to it later to add some more stuff to the content but we’ll leave it for now like this.
The “regular” ticket types
Early Bird ticket This is where things are starting to get interesting as we’ll need to create lots of ticket types to cover the whole scenario. Of course, to build up a hype and gain traction, you will certainly want to release limited number of “early bird” tickets offering them at the special price, so let’s start from there. Create new ticket type by navigating to Ticket Types area of Tickera and clicking Create New button. Now, name this ticket type something like Early Bird or Limited Time Offer… it’s all up to you so get creative 🙂To make this real Early Bird ticket we’ll need to set up start and end date and time during which these tickets will be available for purchase.To do this locate the Available dates for ticket selling area and then select During selected date range and enter start and end date and time during which you would like to offer this ticket type for sale. Also, to avoid someone purchasing all these tickets at once, you should set Max tickets per order to, say, 2 (two) so that customer can purchase only two of these tickets per single order. You can also limit the available quantity of this ticket type. Now, as this Early Bird ticket type will be valid throughout all four days of the festival, there is no need to change available dates for ticket check-in so you can leave it as open ended. But, to avoid frauds, it is advised to limit the number of check-ins to 4 (four), once per each day. The rest of the ticket types Now that we have created an Early Bird ticket, we need to create other ticket types that we’re going to sell. So, let’s start with the “one-day” tickets. We’ll need four of these which will be pretty much the same and will have the same price, quantity, number of allowed check-ins, etc. What should be different for each of these is the available dates/times for ticket check-in as each of these ticket types should be allowed for check-in only on the day they represent.
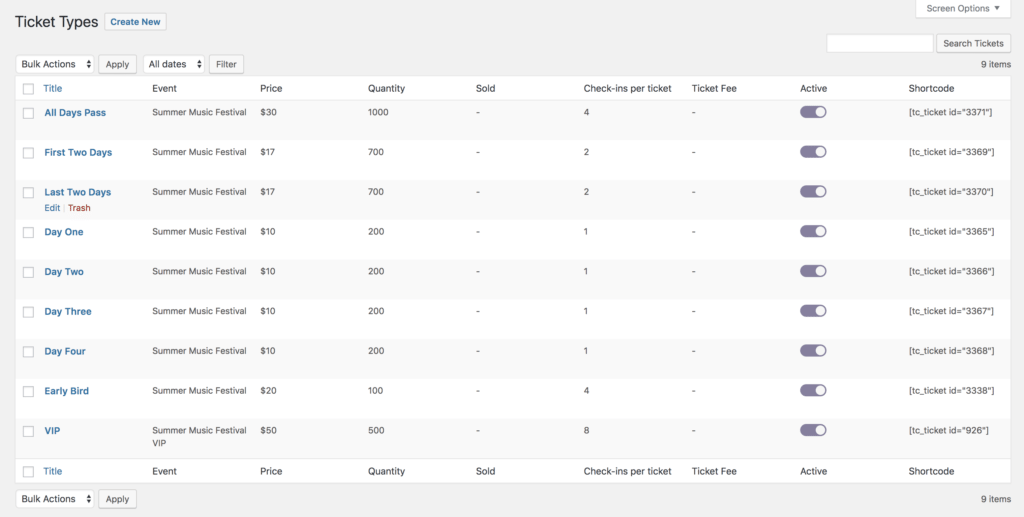 Ticket types for the first two days and last two days are basically the same as the tickets for one day with the difference being the allowed number of check-ins which in this case should be set to 2 (two) and, of course, date/time of the ticket check-in availability should be set to match the time frame they represent.
Last but not least, we need, of course a ticket for all the four days which will be the same as the Early Bird ticket but will have, of course, different date and time during which this ticket type will be sold.
One thing common for all these ticket types is that you should set their start date/time for ticket selling to match the end date/time of the early bird ticket type. That way, these ticket types will appear on the event page at the exact same time when early bird ticket type expires.
Ticket types for the first two days and last two days are basically the same as the tickets for one day with the difference being the allowed number of check-ins which in this case should be set to 2 (two) and, of course, date/time of the ticket check-in availability should be set to match the time frame they represent.
Last but not least, we need, of course a ticket for all the four days which will be the same as the Early Bird ticket but will have, of course, different date and time during which this ticket type will be sold.
One thing common for all these ticket types is that you should set their start date/time for ticket selling to match the end date/time of the early bird ticket type. That way, these ticket types will appear on the event page at the exact same time when early bird ticket type expires.
VIPs and their tickets
For this particular matter we’ll create another event as we want to separate this part of the event entirely from the “regular” part. So, create an event and name it any way you see fit and that’s it… no further fields are required as we’re not going to use this event page anywhere so the rest is not important. Now, create VIP ticket type and associate it with this newly created, VIP event. Enter the quantity of available tickets for this ticket type (hint: it should match the number of the seats you have at disposal in VIP area) and set the price.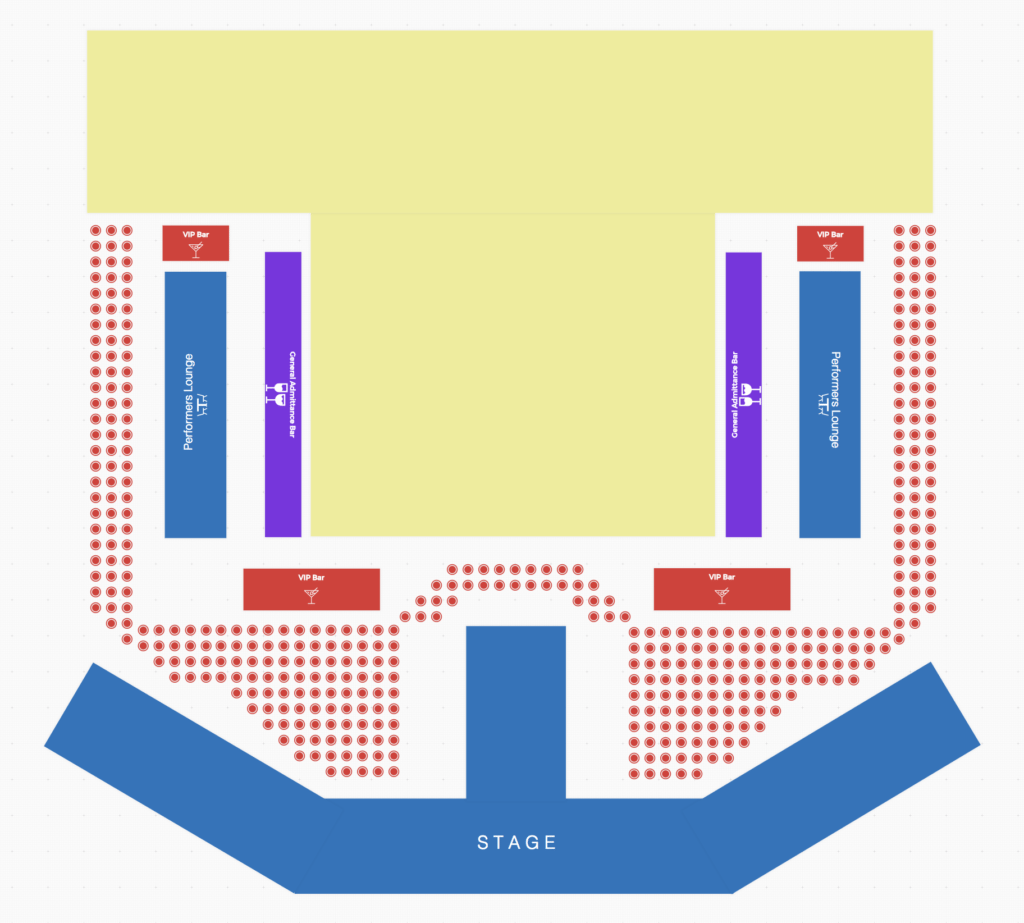 Once done with this, head to the Seating Charts area of Tickera and create new seating chart associated with the VIP event. Now, create seating group(s) that resemble the seat layout VIP area of your event and assign VIP ticket type to these seats, then assign seat labels and numbers. If you’re not sure how to do this, a thorough instruction on creating seating groups with Seating Charts add-on can be found here.
Setting up the event page
As we have mentioned previously, we will be back to editing the event page once we set all the ticket types. So, it is time now to set up the event page as we’re going to use it to say a few words about our festival and offer the tickets for sale on this very page. While we were initially setting up the event, we have checked Show Tickets Automatically. As a result of this, a table with all the existing tickets will be displayed at the event page and it will be displayed at the end of the content. However, if you want to display it elsewhere, you can uncheck Show Tickets Automatically and then use a simple [tc_event] shortcode which has completely the same purpose but allows you to place the table with the existing ticket types wherever you see fit. Once done with entering the description and displaying the table with the tickets all what is left to do is to offer VIP tickets for sale. Now, as these tickets technically belong to different event, Show Tickets Automatically or [tc_event] shortcode won’t display these. Also, these tickets should be purchased through the seating chart so we’ll place it on this event page a bit differently. Luckily, thanks to Tickera’s shortcode builder, it is quite easy to display it and since this is going to be Pick your Seats button we’ll be placing it as described in our documentation here. When this button is clicked, a seating chart will be loaded from where your attendees will be able to select their desired VIP seats. At the end, we should end up with something like this on the front end: Please note that this screenshot is for illustrative purposes only. The looks of the event page will vary drastically based on the theme you are using.
Ticket Selling
So, you’ve set everything up and the day has come to start ticket sales for your festival. You’re starting off with the Early Bird tickets which will appear in the table of the existing tickets on the event page at the exact start date and time as you have set it within Available dates for ticket selling option for that ticket type. When this ticket type expires, if you have set “regular” ticket types to appear at the same time when Early Bird one expires, you won’t have to do anything as all of it will happen automatically.Don’t leave anything to chance! Do your homework!Before you start selling tickets, it would be wise to take a look at our post here which, in a way, is sort of a “checklist” of things you should do before you start selling tickets on your website. Another post worth reading through is titled Barcode Scanners and Check-in apps: which one and why? as it deals with the common questions and experience from the field regarding ticket check-in at the door.
At the day of the event
Ticket sales are done and the day of the event is coming close. If you have followed all the hints, tips and tricks we have provided so far, there is not a thing to worry about as far as ticket check-in process is concerned but we still owe you one explanation 🙂 At the beginning of this post, when we talked about VIPs and their tickets, we have mentioned that we will completely separate them by creating a whole different event and you probably wondered why is that. Primarily, the reason for this is to make it possible to control access to VIP area with the Check-in app. When the event is created, an API key for that event is automatically generated and this API key can be then used with the Check-in app to check the tickets in for that particular event. Now, as we don’t want anyone without VIP tickets to be able to access VIP area, we need somehow to separate them. The solution is creating a separate event. But wait, doesn’t that mean then that people with VIP tickets won’t be able to enter the festival at the same door where people with “regular” tickets are entering? Well, yes and no 🙂 The trick here is that checking in at the main entrance should be performed using API key for all events. This means that attendees with all the tickets, regardless of the type and event will be able to check-in. But, at the entrance of VIP area, you will have another check-in point where you will be using API key that is tied to the VIP event (that “other” event you have created and to which you have associated VIP ticket type). Therefore, attendees with “regular” tickets won’t be able to check-in at this entrance simply as their tickets doesn’t belong to that event. It’s a simple solution and, in a way, a bit of a workaround but based on the experience from the field and feedback of our customers, it is very efficient solution and often used by Tickera users. Another reason for separating VIP tickets from the rest is that we want to use Show Tickets Automatically option. If VIP tickets were associated with the “main” event, VIP ticket type would be displayed among the rest of the tickets. But this is a problem as VIP area has labeled seats and tickets purchased apart from the seating chart wouldn’t have any seat label or number assigned to them. Therefore, we have simply created another event and then associated VIP ticket type to that event after which we have added Pick Your Seats button to the page of the main event.Wrap up
Unlike the use case of using Tickera at the conference which we were writing about here, this scenario is not dealing with the elaborate options for ticket types themselves but rather the other way around. The idea of this use case was to present a simple event ticketing scenario but with plenty of little details, tips and workarounds which are often used among Tickera users but are not apparent at first. All this might seem a bit confusing and complicated at first but if you break down scenario to simple bits, you’ll realize that a solution applied here is highly logical, efficient and, at the end, not at all that complicated as it might seem at the beginning. Of course, your exact scenario might require additional tweaking and different approach but the great thing about Tickera is that plethora of its options allows you to tweak all the bits and pieces and even take a whole different approach and achieve the same result. That said, if you have used Tickera in similar way but a bit different and want to share your use case with us, please do by shooting us an email and we’ll gladly publish it here.FAQ
How do I sell tickets for individual festival days and full passes?
Create a ticket type for each single day, additional types for the day combinations you want to offer, and one type for the full multi-day pass. Each gets its own price and quantity, and buyers pick the combination that suits them.
How do I set up a VIP area with reserved seating?
Use the Seating Charts add-on to map the VIP area and offer a limited number of reserved seats. Buyers select their seat at checkout, and you can attach perks such as complimentary drinks to the VIP ticket type.
How do attendees get checked in at a festival?
Each ticket includes a scannable barcode or QR code. Use a barcode reader or check-in app at the gate to validate tickets quickly, which is essential when large crowds arrive at once.
Can one festival have many ticket types in Tickera?
Yes. A single event can include as many ticket types as you need, per-day, multi-day, full pass, and VIP, each with its own price, limit, and sale window.