Walking the WooCommerce Bridge (part 1)
A while ago, we have released the long awaited Bridge for WooCommerce. Since then, we were getting tons of feedback from our customers with unimaginable creative ways for using it. Also, we are frequently getting questions like "how to do this or that" or "is it possible" with Bridge for WooCommerce. Each time we come up with some solution that we think might be useful for many, we release a blog post about it. However, we are constantly driven to learn more and expand the possibilities using this great tool and its vast selection of add-ons.
We have already came up with the solution for bulk ticket sales and name your own price - donation type of ticket sales and those solutions proved to be working surprisingly good based on the feedback of our customers.
But there are plenty more tricks in the bag that we gathered over the time and we are more than willing to share those with you. This is why this is just part one of many more to come.
So, let's get started...
Q: I need to have multiple ticket types but to be able to maintain overall number of available tickets for the event. How do I do that?
A: Easy 🙂 As you probably know, WooCommerce offers the ability to create variable products which may have different prices. So, all you need to do is to create just one ticket type as variable WooCommerce product (thorough instruction on that can be found here - at about middle of the page) and set the stock quantity to the desired overall number of available tickets. Now you just need to create variations for your ticket and set the prices for each of the variations and that's it: you will now have one product with XX availability while having multiple variations for it.
Q: I am having an event that lasts for five days and want to offer three different ticket types so that user can select which ticket type for which day they would like to attend.
A: In the previous solution we have explained the use of variations for WooCommerce products as tickets. Now just take that and multiply by five 🙂
So, you can create a separate variable product where each of the products will represent different day and use variations to represent ticket types (i.e. Adult, Child, Senior, etc.). Also you can set check-in availability of each of the tickets to correspond with the day they represent.
Q: I was using ticket fees per each ticket type while I was using Tickera alone but this functionality is missing now when ticket types are created as WooCommerce products.
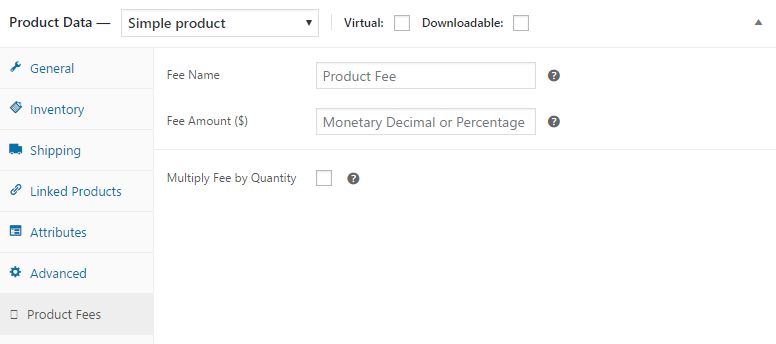
A: Right out of the box, it is not very easy to guess how and where to set this with WooCommerce. Although you can create custom tax classes in WooCommerce to achieve this, it is way more complicated and time consuming than using a free plugin for WooCommerce that will simply add product fee fields for each product where you can enter your custom fee name, select whether you want to use percentage or fixed fee and most importantly, you can enter your fee.

Q: I need to offer a discount based on the number of tickets in the cart. How can I do that?
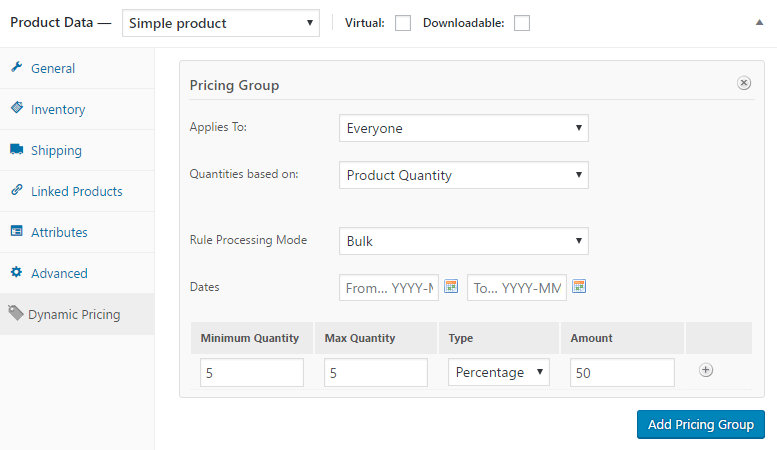
A: Although you might apply a solution with creating ticket bundles and set different (discounted) price for a bundle as discussed in this post, there is much more elegant solution for this that includes WooCommerce Dynamic Pricing plugin. Now, this plugin is not free, but for testing purposes, you can obtain a fully functional copy of it from GitHub. Just remember that you will need a license in order to receive regular updates and support. Ok, so once you install this plugin, you will notice another tab when creating new or editing existing product in WooCommerce. Tab is named Dynamic Pricing and contains plenty of options. You can, for example, set which user roles are eligible for discounts, whether quantities should be based on the product quantities, variation quantities, etc., start and end date during which discounts are available, minimum quantity, maximum quantity... and the list of features goes on and on and the longer you look at those options, the more you realize how powerful this plugin is. And just when you realize all the possibilities, you will notice that you can add multiple pricing groups and therefore define multiple rules for dynamic pricing for the same product. Pretty awesome, right?

Q: When I started using WooCommerce for selling Tickera tickets, I've realized that only couple of payment gateways are supported by WooCommerce. How can I use some other payment gateway?
A: We're getting this question a lot. But the answer is quite simple: right out of the box, WooCommerce offers support for PayPal, Stripe, Cash on Delivery, Check Payments and BASC. But that is certainly not the only payment gateways they support. Unlike Tickera which has integrated many payment gateways itself, most of the payment gateways for WooCommerce are provided through add-ons. And, oh boy, is there a plenty to choose from. Just check this list of officially supported payment gateways on their page! Ok, vast majority of these are not free but there is also a long list of third party plugins which can add certain payment gateways to WooCommerce on the WordPress.org repository and it seems that the list grows every day. So, the conclusion is that, wherever you or your business are, there is very slim chance that WooCommerce won't have you covered with at least a couple of payment gateways.
Q: I need to be able to set a different fee for each of the payment gateways.
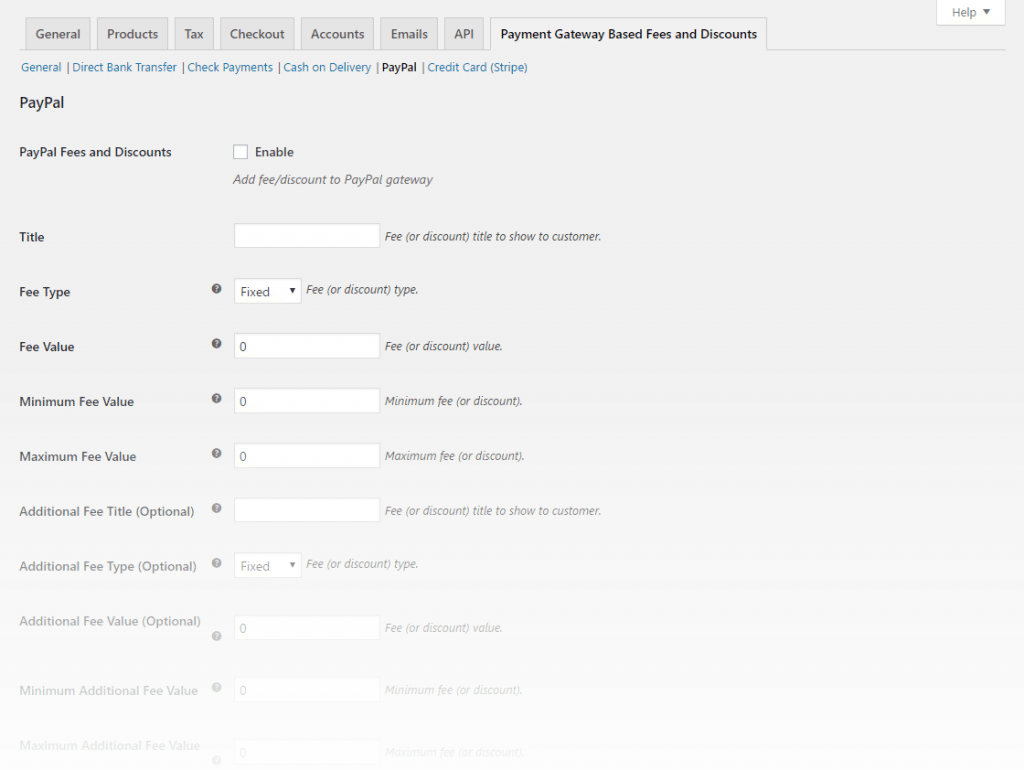
A: Yes, we know that different payment gateways have different fees for processing funds. And sometimes, it just doesn't feel fair to charge customers more that it is needed. Luckily, there is a free plugin by using which you can define a fee for each of the payment gateways. This is great if you want to compensate your expenses with payment gateways (which, we believe, you should). Also, this plugin works the other way around and offers you to set a discount if certain payment gateway is used. The whole chunk of the options this plugin has to offer are pretty self explanatory and can be found in a separate tab within WooCommerce Settings.

Q: I want different payment gateways on the checkout based on which products are added to the cart.
A: First time we were asked this question, we thought that this is isolated and highly specific case. But then we had people asking for this more and more. So, whatever the reason is behind your need for this, there is a solution. You can find a free plugin in WordPress.org repository that does just that. When installed, each time you are creating new or editing existing product, you can choose on the right side which payment gateways should be available for this product.
Wrap up
Since Tickera and WooCommerce are constantly evolving, we'll try to keep up with this ever changing game, so expect soon part two where we'll be adding new stuff based on our customer requests and newly found solutions. Of course, if you have an idea what we should cover or found out some interesting solution yourself, let us know in the comments below.
Have fun and as always... Happy Ticketing!